0


TTGO T-Display ESP32
26,000 د.ع
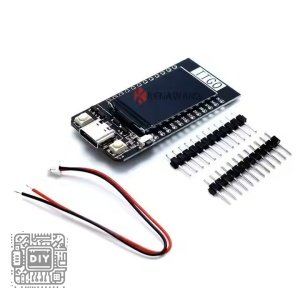
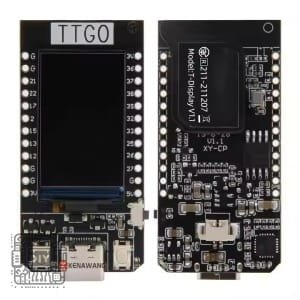
Build compact, visually interactive IoT projects with the TTGO T-Display ESP32 Development Board, a powerful and feature-rich module featuring the ESP32 dual-core processor and a vibrant 1.14-inch full-color IPS LCD. This all-in-one development board integrates the ESP32 chip with Wi-Fi and Bluetooth connectivity, a USB Type-C port, lithium battery charging circuitry, and a built-in 1.14-inch 135×240 pixel display driven by the ST7789V controller .
In stock
CompareDescription
TTGO T-Display ESP32 CH9102F Development Board – 1.14 Inch LCD with 4MB Flash
Build compact, visually interactive IoT projects with the TTGO T-Display ESP32 Development Board, a powerful and feature-rich module featuring the ESP32 dual-core processor and a vibrant 1.14-inch full-color IPS LCD. This all-in-one development board integrates the ESP32 chip with Wi-Fi and Bluetooth connectivity, a USB Type-C port, lithium battery charging circuitry, and a built-in 1.14-inch 135×240 pixel display driven by the ST7789V controller .
The CH9102F USB-to-serial chip ensures reliable and high-speed communication with your computer, making this board an excellent choice for wearable devices, data loggers, smart home controllers, and portable gaming projects where a compact form factor and visual feedback are essential.
Key Features
Integrated 1.14 Inch IPS LCD Display
Features a high-quality 1.14-inch IPS LCD with 135×240 pixel resolution and ST7789V driver, offering vibrant colors, wide viewing angles, and crisp text and graphics for user interfaces and data visualization .
Powerful ESP32 Dual-Core Processor
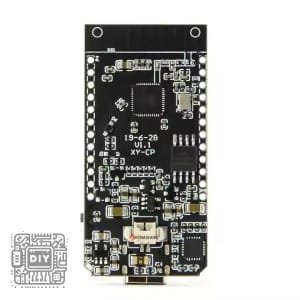
Powered by the ESPRESSIF ESP32 chip with a 240MHz Xtensa dual-core 32-bit LX6 microprocessor, 520KB SRAM, and 4MB QSPI flash, providing ample processing power and memory for complex IoT applications .
USB Type-C Connectivity
Modern USB Type-C port provides reliable power delivery, programming, and serial communication. The CH9102F USB-to-serial chip ensures stable firmware uploads and serial monitoring .
Built-in Battery Management
Includes a 2-pin JST battery connector (1.25mm pitch) for 3.7V lithium batteries. The onboard charging circuit supports 500mA charging current via USB, with hardware battery management for safe and convenient portable operation .
Comprehensive Wireless Connectivity
Integrated 2.4GHz Wi-Fi (802.11 b/g/n) supporting Station, SoftAP, and P2P modes, plus Bluetooth 4.2 with BLE (Bluetooth Low Energy) for low-power wireless applications .
Wide Power Supply Range
Operates from USB 5V or 3.7V lithium battery, with working voltage of 2.7V-4.2V. Low sleep current of approximately 120µA makes it ideal for battery-powered portable projects .
Compact and Lightweight Design
Measures just 51.52mm x 25.04mm x 8.54mm and weighs only 7.81g, allowing easy integration into wearable devices, small enclosures, and portable electronics .
Rich Peripheral Interfaces
Supports UART, SPI, SDIO, I2C, LED PWM, I2S, ADC, DAC, capacitive touch sensor, and multiple GPIO pins for connecting various sensors and actuators .
Multiple Programming Platform Support
Fully compatible with Arduino IDE, MicroPython, and ESP-IDF, with extensive library support including TFT_eSPI for easy display programming .
Reset Button and Power Indicator
Onboard reset button for easy system restart, and blue power LED (non-programmable) indicates power status .
Specifications
| Parameter | Value |
|---|---|
| Chipset | ESPRESSIF-ESP32 (240MHz Xtensa dual-core LX6) |
| Flash Memory | 4MB QSPI Flash |
| SRAM | 520KB |
| Display | 1.14 inch IPS LCD (ST7789V driver) |
| Display Resolution | 135 x 240 pixels |
| USB-to-Serial Chip | CH9102F |
| USB Connector | USB Type-C |
| Wi-Fi | 802.11 b/g/n (2.4GHz) |
| Bluetooth | V4.2 BR/EDR + BLE |
| Operating Voltage | 2.7V – 4.2V |
| Power Input | USB 5V or 3.7V Lithium Battery |
| Charging Current | 500mA |
| Battery Connector | JST 2-pin 1.25mm |
| Operating Current | Approximately 60mA |
| Sleep Current | Approximately 120µA |
| Operating Temperature | -40°C to +85°C |
| Dimensions | 51.52mm x 25.04mm x 8.54mm |
| Weight | Approximately 7.81g |
| Interfaces | UART, SPI, SDIO, I2C, PWM, I2S, ADC, DAC, GPIO |
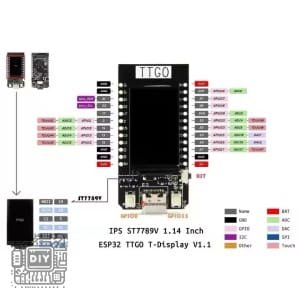
Pin Configuration
| Pin | Function | Description |
|---|---|---|
| 3V3 | 3.3V Output | Regulated 3.3V output (max 500mA) |
| 5V | 5V Input | Power input from USB or external 5V |
| GND | Ground | Common ground |
| D0-D15 | GPIO | General purpose I/O pins |
| SDA/SCL | I2C | I2C communication pins |
| TX/RX | UART | Serial communication pins |
| SCK/MOSI/MISO | SPI | SPI interface pins |
| ADC | Analog Input | Analog-to-digital converter pins |
| BAT+ | Battery Positive | Connect to 3.7V Li-Po battery positive |
| BAT- | Battery Negative | Connect to battery negative |
*Note: GPIO36 to GPIO39 are input-only pins .*
Wiring Diagram
Basic Power and Programming
USB Type-C Cable -----> Board USB Port
(Provides 5V power and programming via CH9102F)
Battery-Powered Operation
3.7V Li-Po Battery -----> JST Connector (BAT+ / BAT-)
(For portable, untethered projects)
Connecting I2C Sensor
TTGO T-Display              I2C Sensor
--------------              ----------
3.3V            ----->      VCC
GND             ----->      GND
SDA             ----->      SDA
SCL             ----->      SCL
Arduino IDE Setup
Step 1: Install ESP32 Board Support
Open Arduino IDE
Go to File > Preferences
Add the following URL to “Additional Boards Manager URLs”:
https://raw.githubusercontent.com/espressif/arduino-esp32/gh-pages/package_esp32_index.jsonOpen Tools > Board > Boards Manager
Search for “ESP32” and install the “ESP32 by Espressif Systems” package
Step 2: Install CH9102F Drivers
Download and install the CH9102F USB-to-Serial drivers from the manufacturer’s website
After installation, connect the board and verify the COM port appears in Device Manager
Step 3: Install TFT_eSPI Library
Open Sketch > Include Library > Manage Libraries
Search for “TFT_eSPI” and install by Bodmer
Configure the library for TTGO T-Display:
Navigate to
Arduino/libraries/TFT_eSPI/User_SetupsOpen
Setup25_TTGO_T_Display.hor comment/uncomment the appropriate lines inUser_Setup_Select.h
Step 4: Select Board Configuration
Select ESP32 Dev Module from the Boards menu
Set PSRAM to “Disabled”
Set Flash Size to “4MB”
Select the correct COM port
Arduino Code Example (Display Test)
#include <TFT_eSPI.h>

TFT_eSPI tft = TFT_eSPI();

void setup() {
  Serial.begin(115200);
  Serial.println("TTGO T-Display ESP32 Ready");

  // Initialize display
  tft.init();
  tft.setRotation(1);  // Landscape orientation
  tft.fillScreen(TFT_BLACK);

  // Set text properties
  tft.setTextColor(TFT_WHITE, TFT_BLACK);
  tft.setTextSize(2);

  // Display welcome message
  tft.setCursor(10, 20);
  tft.println("TTGO T-Display");
  tft.setCursor(10, 50);
  tft.println("ESP32 CH9102F");
  tft.setCursor(10, 80);
  tft.println("4MB Flash");
  tft.setCursor(10, 110);
  tft.println("1.14\" LCD");

  delay(2000);
  tft.fillScreen(TFT_BLACK);
}

void loop() {
  // Draw rainbow effect
  for (int i = 0; i < 240; i++) {
    tft.drawFastHLine(0, i, 135, rainbowColor(i));
  }
  delay(1000);
}

uint16_t rainbowColor(int value) {
  // Simple rainbow color mapping
  byte r = 0, g = 0, b = 0;
  value = value % 240;
  if (value < 80) {
    r = 255 - (value * 3);
    g = value * 3;
    b = 0;
  } else if (value < 160) {
    r = 0;
    g = 255 - ((value - 80) * 3);
    b = (value - 80) * 3;
  } else {
    r = (value - 160) * 3;
    g = 0;
    b = 255 - ((value - 160) * 3);
  }
  return tft.color565(r, g, b);
}
Arduino Code Example (Wi-Fi Connection Test)
#include <WiFi.h>
#include <TFT_eSPI.h>

TFT_eSPI tft = TFT_eSPI();

const char* ssid = "YOUR_SSID";
const char* password = "YOUR_PASSWORD";

void setup() {
  Serial.begin(115200);

  // Initialize display
  tft.init();
  tft.setRotation(1);
  tft.fillScreen(TFT_BLACK);
  tft.setTextColor(TFT_WHITE, TFT_BLACK);
  tft.setTextSize(1);

  tft.setCursor(10, 20);
  tft.println("Connecting to WiFi...");

  // Connect to Wi-Fi
  WiFi.begin(ssid, password);
  while (WiFi.status() != WL_CONNECTED) {
    delay(500);
    tft.print(".");
  }

  tft.setCursor(10, 50);
  tft.println("Connected!");
  tft.setCursor(10, 70);
  tft.print("IP: ");
  tft.println(WiFi.localIP());

  Serial.print("Connected. IP address: ");
  Serial.println(WiFi.localIP());
}

void loop() {
  // Your application code here
  delay(1000);
}
Display Setup Configuration
To properly configure the TFT_eSPI library for the TTGO T-Display:
Locate the
User_Setup_Select.hfile in your Arduino libraries directory:
Documents/Arduino/libraries/TFT_eSPI/User_Setup_Select.hComment out the default setup:
//#include <User_Setup.h>Uncomment the TTGO T-Display setup:
#include <User_Setups/Setup25_TTGO_T_Display.h>
Alternatively, you can create a custom setup with the following display parameters:
| Parameter | Value |
|---|---|
| Driver | ST7789 |
| Width | 135 |
| Height | 240 |
| Rotation | 1 (landscape) or 3 (portrait) |
Common Applications
Portable IoT data loggers and sensors
Smart home controllers and displays
Wearable electronics and smart watches
Handheld gaming devices
Battery monitoring systems
Environmental monitoring stations
Remote controls and human-machine interfaces
Educational electronics projects
Wireless sensor nodes with display feedback
Important Usage Notes
The blue power LED is not programmable and remains on when power is applied
GPIO36 to GPIO39 are input-only pins; they cannot be configured as outputs
The LCD backlight is connected to GPIO4 and can be controlled via PWM for brightness adjustment
For battery-powered applications, include battery voltage monitoring code to enter deep sleep when voltage drops below 3.2V to protect Li-Po batteries
The battery management circuit handles charging but does not include under-voltage cutoff for discharging
When using the display, a full-screen Sprite can achieve flicker-free animation at >40 FPS
The operating current of approximately 60mA may vary depending on Wi-Fi/BT activity and display usage
For maximum Wi-Fi range, ensure adequate antenna clearance around the PCB
Package Contents
1 x TTGO T-Display ESP32 CH9102F Development Board
1 x USB Type-C Cable (depending on version)
2 x 12-Pin Male Header (may require soldering)
(Note: Battery is NOT included and must be purchased separately. Header pins may require soldering depending on the version.)
لوحة تطوير TTGO T-Display ESP32 CH9102F – شاشة LCD 1.14 بوصة مع ذاكرة 4 ميجابايت
ابنِ مشاريع إنترنت الأشياء التفاعلية والمدمجة باستخدام لوحة تطوير TTGO T-Display ESP32، وهي وحدة قوية وغنية بالميزات تتميز بمعالج ESP32 ثنائي النواة وشاشة LCD IPS ملونة بحجم 1.14 بوصة. تدمج لوحة التطوير المتكاملة هذه شريحة ESP32 مع اتصال Wi-Fi و Bluetooth ومنفذ USB Type-C ودائرة شحن بطارية ليثيوم وشاشة مدمجة 1.14 بوصة بدقة 135 × 240 بكسل بمشغل ST7789V. تضمن شريحة CH9102F اتصالاً تسلسليًا موثوقًا وعالي السرعة مع جهاز الكمبيوتر الخاص بك، مما يجعل هذه اللوحة خيارًا ممتازًا للأجهزة القابلة للارتداء ومسجلات البيانات ووحدات التحكم المنزلية الذكية ومشاريع الألعاب المحمولة حيث يكون الشكل المدمج والتغذية البصرية ضروريين.
المميزات الرئيسية
شاشة LCD IPS مدمجة 1.14 بوصة
تتميز بشاشة LCD IPS عالية الجودة بحجم 1.14 بوصة بدقة 135 × 240 بكسل ومشغل ST7789V، مما يوفر ألوانًا نابضة بالحياة وزوايا رؤية واسعة ونصوصًا ورسومات واضحة لواجهات المستخدم وتصور البيانات.
معالج ESP32 ثنائي النواة القوي
مدعوم بمعالج ESPRESSIF ESP32 بتردد 240 ميجاهرتز مع نواة مزدوجة Xtensa LX6 32 بت، وذاكرة وصول عشوائي 520 كيلوبايت وذاكرة فلاش QSPI سعة 4 ميجابايت.
اتصال USB Type-C
يوفر منفذ USB Type-C الحديث توصيلًا موثوقًا للطاقة والبرمجة والاتصال التسلسلي. تضمن شريحة CH9102F تحميلًا ثابتًا للبرامج الثابتة ومراقبة تسلسلية.
إدارة بطارية مدمجة
يتضمن موصل بطارية JST 2 دبوس لبطاريات الليثيوم 3.7 فولت مع دائرة شحن مدمجة تدعم 500 مللي أمبير.
اتصال لاسلكي شامل
يدمج Wi-Fi 2.4 جيجاهرتز و Bluetooth 4.2 مع BLE للتطبيقات اللاسلكية منخفضة الطاقة.
نطاق طاقة واسع
يعمل من USB 5V أو بطارية ليثيوم 3.7V، مع تيار سكون منخفض حوالي 120 ميكروأمبير.
تصميم مضغوط وخفيف الوزن
أبعاد 51.52 مم × 25.04 مم × 8.54 مم ووزن 7.81 جرام فقط.
دعم متعدد منصات البرمجة
متوافق تمامًا مع Arduino IDE و MicroPython و ESP-IDF.
المواصفات الفنية
| المعامل | القيمة |
|---|---|
| الشريحة | ESPRESSIF-ESP32 |
| تردد المعالج | 240 ميجاهرتز |
| ذاكرة الفلاش | 4 ميجابايت |
| ذاكرة الوصول العشوائي | 520 كيلوبايت |
| الشاشة | 1.14 بوصة IPS LCD |
| دقة الشاشة | 135 × 240 بكسل |
| شريحة USB-to-serial | CH9102F |
| موصل USB | USB Type-C |
| Wi-Fi | 802.11 b/g/n |
| Bluetooth | V4.2 + BLE |
| جهد التشغيل | 2.7V – 4.2V |
| تيار التشغيل | حوالي 60 مللي أمبير |
| تيار السكون | حوالي 120 ميكروأمبير |
| الأبعاد | 51.52 مم × 25.04 مم × 8.54 مم |
| الوزن | حوالي 7.81 جرام |
إعداد Arduino IDE
الخطوة 1: تثبيت دعم لوحة ESP32
افتح Arduino IDE
انتقل إلى File > Preferences
أضف عنوان URL التالي إلى “Additional Boards Manager URLs”:
https://raw.githubusercontent.com/espressif/arduino-esp32/gh-pages/package_esp32_index.jsonافتح Tools > Board > Boards Manager
ابحث عن “ESP32” وقم بتثبيت الحزمة
الخطوة 2: تثبيت برامج تشغيل CH9102F
قم بتنزيل وتثبيت برامج تشغيل CH9102F من موقع الشركة المصنعة
الخطوة 3: تثبيت مكتبة TFT_eSPI
افتح Sketch > Include Library > Manage Libraries
ابحث عن “TFT_eSPI” وقم بتثبيتها
الخطوة 4: تحديد إعدادات اللوحة
اختر ESP32 Dev Module من قائمة Boards
اضبط PSRAM على “Disabled”
اضبط Flash Size على “4MB”
كود Arduino مثال
#include <TFT_eSPI.h>

TFT_eSPI tft = TFT_eSPI();

void setup() {
  Serial.begin(115200);
  Serial.println("TTGO T-Display ESP32 جاهز");

  tft.init();
  tft.setRotation(1);
  tft.fillScreen(TFT_BLACK);
  tft.setTextColor(TFT_WHITE, TFT_BLACK);
  tft.setTextSize(2);

  tft.setCursor(10, 20);
  tft.println("TTGO T-Display");
  tft.setCursor(10, 50);
  tft.println("ESP32 CH9102F");
  tft.setCursor(10, 80);
  tft.println("4MB Flash");
}

void loop() {
  // كود التطبيق الخاص بك هنا
}
التطبيقات الشائعة
أجهزة استشعار إنترنت الأشياء المحمولة
وحدات التحكم المنزلية الذكية
الأجهزة القابلة للارتداء والساعات الذكية
أجهزة ألعاب محمولة
أنظمة مراقبة البطارية
محطات المراقبة البيئية
ملاحظات استخدام مهمة
GPIO36 إلى GPIO39 هي دبابيس إدخال فقط
الإضاءة الخلفية للشاشة متصلة بـ GPIO4 ويمكن التحكم فيها
للاستخدام بالبطارية، قم بمراقبة جهد البطارية في الكود
تيار التشغيل حوالي 60 مللي أمبير
محتويات العلبة
1 × لوحة تطوير TTGO T-Display ESP32 CH9102F
1 × كابل USB Type-C
2 × رأس دبابيس 12 دبوس


Reviews
There are no reviews yet